This post are part of my final project, “Design and Implementation of Arduino based rtpMIDI and 5 pin MIDI”.
After discussing with my tutor, and thinking about it lately, I decided to not use Arduino Mega. Fortunately, on the title of my final project (Indonesia : Perancangan dan Implementasi rtpMIDI dan MIDI 5 pin berbasis Arduino), there are no “Arduino Mega” mentioned. I still use Arduino IDE, also still using ESP8266, so yeah … Here it goes.
Today, we’re going to talk about sending MIDI using Wemos D1 or Arduino. I personally own Wemos D1.
Used hardware
- Arduino or Wemos
- MIDI jack (I used old broken MIDI cable)
- 2x 220 ohm resistor
- Cable (I used Cat5 cable)
- Solder
- MIDI Instrument for testing
According to official Arduino tutorial, here goes the schematics
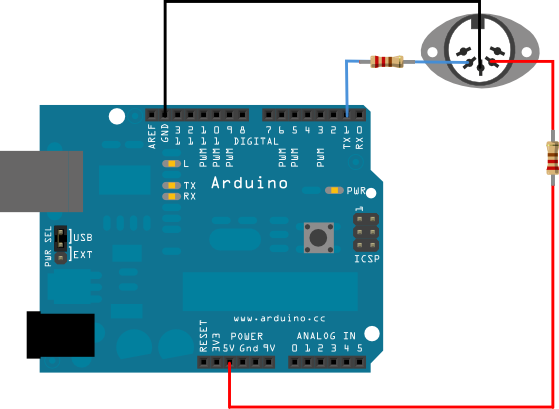
For wemos, follow it as close as possible.
- PIN 2 to ground
- PIN 4 to TX, use 220 ohm resistor
- PIN 5 to 5v, use 220 ohm resistor
Code sample, a little different with the official tutorial.
/*
  MIDI note player

  This sketch shows how to use the serial transmit pin (pin 1) to send MIDI note data.
  If this circuit is connected to a MIDI synth, it will play the notes
  F#-0 (0x1E) to F#-5 (0x5A) in sequence.

  The circuit:
  - digital in 1 connected to MIDI jack pin 5
  - MIDI jack pin 2 connected to ground
  - MIDI jack pin 4 connected to +5V through 220 ohm resistor
  - Attach a MIDI cable to the jack, then to a MIDI synth, and play music.

  created 13 Jun 2006
  modified 13 Aug 2012
  by Tom Igoe

  This example code is in the public domain.

  http://www.arduino.cc/en/Tutorial/Midi
*/

void setup() {
  // Set MIDI baud rate:
  Serial.begin(31250);
  pinMode(LED_BUILTIN, OUTPUT);
}

void loop() {
  // play notes from F#-0 (0x1E) to F#-5 (0x5A):
  for (int note = 0x1E; note < 0x5A; note ++) {
    //Note on channel 1 (0x90), some note value (note), middle velocity (0x45):
    noteOn(0x90, note, 0x45);
    digitalWrite(LED_BUILTIN, HIGH);
    delay(1000);
    //Note on channel 1 (0x90), some note value (note), silent velocity (0x00):
    noteOn(0x90, note, 0x00);
    digitalWrite(LED_BUILTIN, LOW);
    delay(1000);
  }
}

// plays a MIDI note. Doesn't check to see that cmd is greater than 127, or that
// data values are less than 127:
void noteOn(int cmd, int pitch, int velocity) {
  Serial.write(cmd);
  Serial.write(pitch);
  Serial.write(velocity);
}
The difference? On code above, I add digitalWrite to LED_BUILTIN, so every time it sends MIDI message, I can see the LED.
You can see the results above. It doesn't matter about what I'm talking, because it was my report to my lecturer.
Troubleshooting :
- If the instrument doesn't output any sound, check the MIDI settings.
- Roland Juno G have the default MIDI settings off. Yamaha keyboards also can have the MIDI set to off.
- Maybe the connection get loose?
- Try to check the keyboard with another keyboard, with standard MIDI cable.
- Try to swap 5v and TX.
- The schematics were using female connector, I use male jack. I actually have some problem identifying left and right.
- I also used Cat5 jack because it can be used as jumper cable, before soldering it to the microcontroller later.
Incoming Terms
- Esp8266 Midi
- Mengirim Midi Ke Keyboard